
|
|
|
|
|
|
|
|
Legal Disclaimer
The postings, comments, and opinions are provided at your own risk and do not
necessarily represent the views or opinions of AnyoneCanFixIt.com, a
division of Absolute Technologies, Inc., or any manufacturers or
companies listed on this website. AnyoneCanFixIt.com will not claim responsibility for information
posted within these web pages. While all efforts are made to provide
accurate information, the information is provided at your own risk - use it at
your own risk. We are not responsible for the misuse, incorrect installation,
incorrect information, or failure of any products we discuss. NO WARRANTY IS
MADE OR IMPLIED REGARDING ANY PRODUCTS COVERED BY ANYONECANFIXIT.COM or
ABSOLUTE TECHNOLOGIES, INC. NOR DOES ANYONECANFIXIT.COM or ABSOLUTE
TECHNOLOGIES, INC. CLAIM TO PROTECT USERS FROM INJURY OR DEATH. THE USER
ASSUMES ALL RISKS.
We cannot express enough how important it is to read the manufacturers instructions
that are included with every product you buy and use. Failure to do so could
result in incorrect use or installation, which could cause serious injury or
death. Any of these instructions may void or limit warranties provided
by the manufacturers. You assume all responsibilities by purchasing any
of the offered fixes.
Winterization of Your Irrigation System
NOTE: These instructions do not cover the process of blowing pressurized air into your irrigation system to eliminate water within the system. In the southern states, like North Carolina, it's very unlikely that tubes within the ground would ever get cold enough to freeze water in the lines and break the irrigation tubes, so that process is not covered in these instructions.
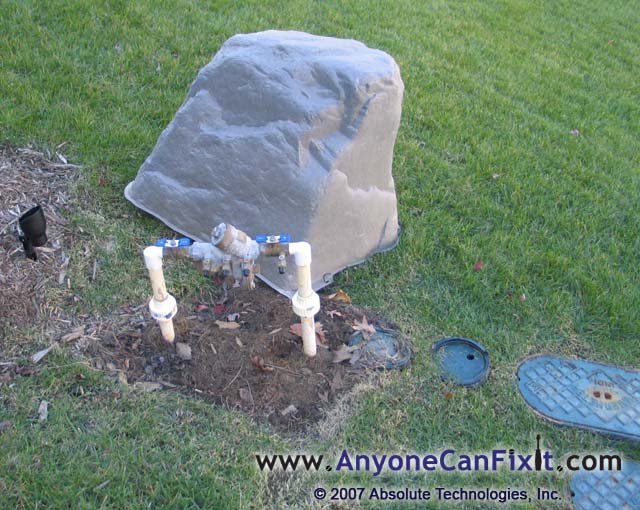
Figure 1 - Irrigation Backflow Valve
If you have an irrigation system with a backflow valve like above in Figure 1 (this one is normally hidden beneath the fake rock), then you need to remove it BEFORE it starts to freeze at night. Upon the first notice that there is a freeze advisory as the season moves into the winter season, you will want to remove the irrigation backflow valve and store it in your warm garage (or somewhere that it will not freeze). If you do not do this, you will find out that these devices can costs several hundred dollars to replace (if they freeze there is a diaphragm that will likely rip or worst is that the water will freeze and crack the brass $$$).
***FIRST, make sure you have your irrigation control unit turned OFF.*** This
is usually located in your garage and is a knob you can turn to OFF.
There are three objects of your irrigation system that you need to be familiar with for winterization. The first is the backflow valve which is the big, metal valve that sticks out of the ground and should be located in a foundation bed of your house or, if you live in Cary, NC, directly beside your water meter. The a backflow valve is shown in Figure 2 below.
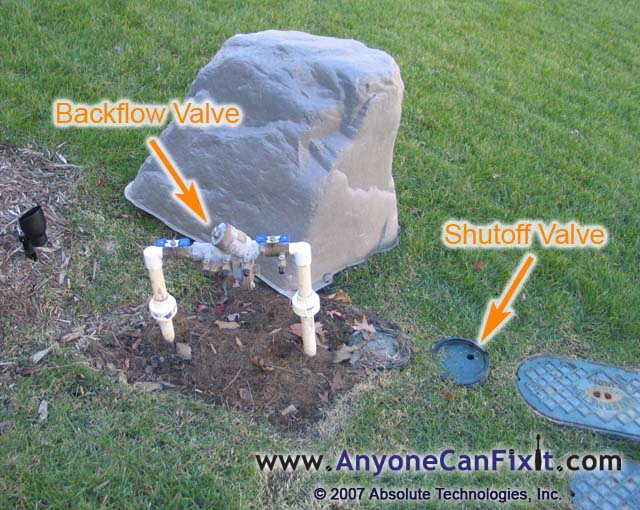
Figure 2 - Irrigation Backflow Valve and Shutoff Valve
The second item to locate is the shutoff valve. The shutoff valve is a small valve that provides water to the irrigation system. It should be located near the back flow valve, in the ground, in a small valve box with a black or green lid. Figure 2 shows the location of the shut off valve.
The third item is the ball valve. The ball valve is a valve that releases the water from your irrigation system. It may be gray in color with a red handle and is typically located in a valve box in a section of your yard that is lower in elevation than most of the rest of your yard. Figure 3 below shows a ball valve. If you cannot find this part of the system, you may still proceed. See the directions below.
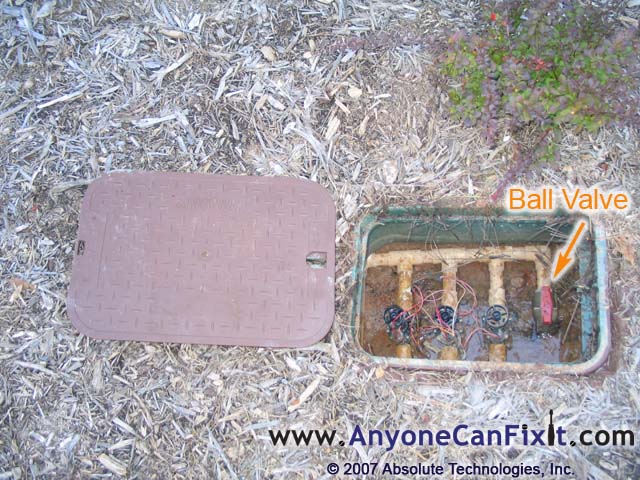
Figure 3 - Ball Valve
If you have located these three objects, you are ready to begin the
winterization process.
Tools & Supplies
The only tool you will likely need for the winterization process is a screw driver. You may need a big wrench if your back flow valve does not have connections that are turned by hand. In this example, the connections are made by hand and no big wrench is needed. You will also need two plastic sandwich bags, and two rubber bands. Thus:
1 screw driver
2 plastic sandwich bags
2 rubber bands
1 big wrench (OPTIONAL - depending upon your connections)
The Winterization Process
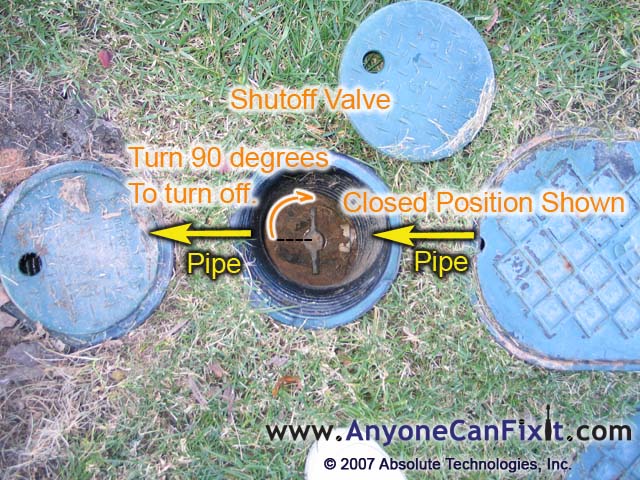
Figure 4: Turning Off the Shutoff Valve
Locate the shutoff valve and turn the valve to the off position. The off position is where the handle of the valve is at a 90 degree angle with the pipe that feeds through it (the waterline). Figure 4 shows how the valve has been turned to the off position (...when the handle is in line with the waterline, it is open). This shuts off the water that supplies water to your irrigation system.
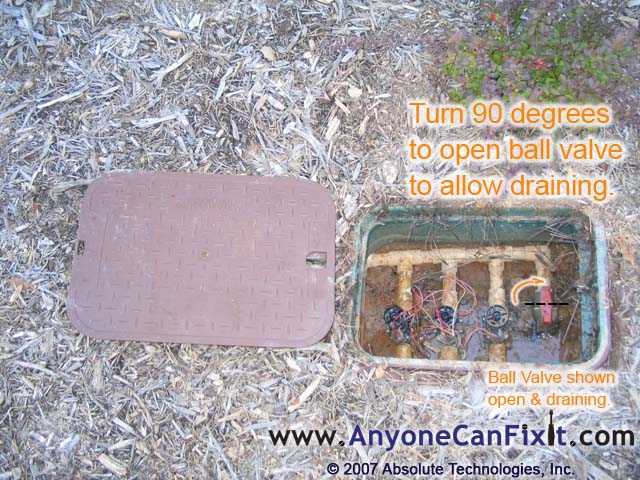
Figure 5: Opening the Ball Valve
After turning off the shutoff valve, open the ball valve to drain the water that is within the system. This valve may have a red handle that is shaped like a T. When the handle is in line with the white pipe, it is open (when it is perpendicular to the white pipe, it is closed). Figure 5 shows the ball valve turned and in the open position. If you cannot find this ball valve, simply go to the irrigation controller and turn one zone on briefly and this will release the water pressure on the irrigation system. Continue to next step.
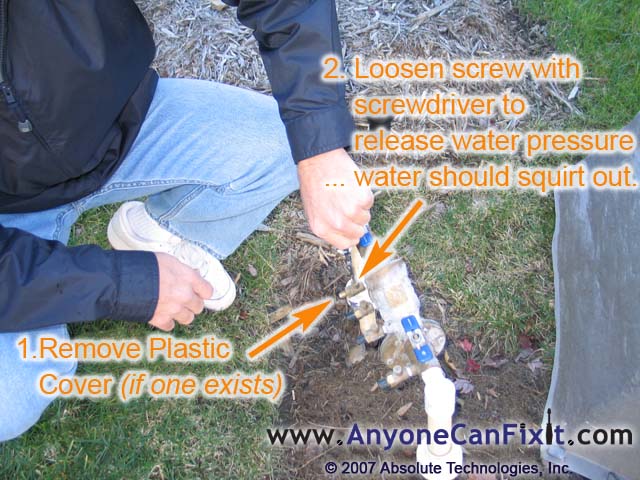
Figure 6: Relieving Pressure in the Back Flow Valve
This step may be optional, but you may want to relieve more pressure in your back flow valve, you may by removing one of the plastic protective caps on one of the pressure relief valves (if the plastic caps are even still on it), and turning the screw on top of it with a screw driver to open it. If there is pressure in the system, some water may squirt out, but it should squirt just for a second (if it continues to squirt, you may not have turned off the shutoff valve). This process is shown in Figure 6 above. On the back flow valve shown above, there are actually 4 points that have a pressure release valves on them to help eliminate all pressure within the backflow valve. You may do this process on all 4 points if you are having problems with the step below on loosening the backflow connections.
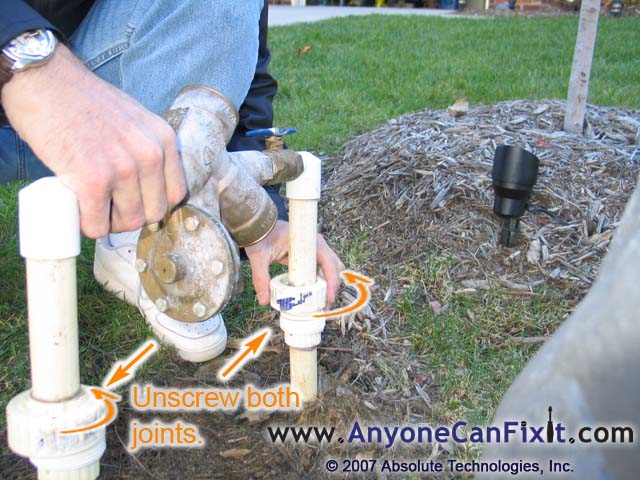
Figure 7: Loosening the Connections of the Back Flow Valve
Take off the backflow valve assembly. The threaded connections on the arms of the backflow are hand-tight (once the water pressure is released, they should twist easily by hand...if not, you may not have the pressure released in the system yet...check the steps above to make sure you have done everything correctly), so simply unscrew them with your hands. See this process in Figure 7 above. Some irrigation systems have have nuts on this connection, in which case, you may need a big wrench for the step...but still, the connections should not need much force to disconnect if the pressure has been properly relieved from the system).
Memorize (or write it down or draw a picture) on which direction the arrow on the backflow is pointing, as you will need to know this when you replace the backflow valve in the spring!!!
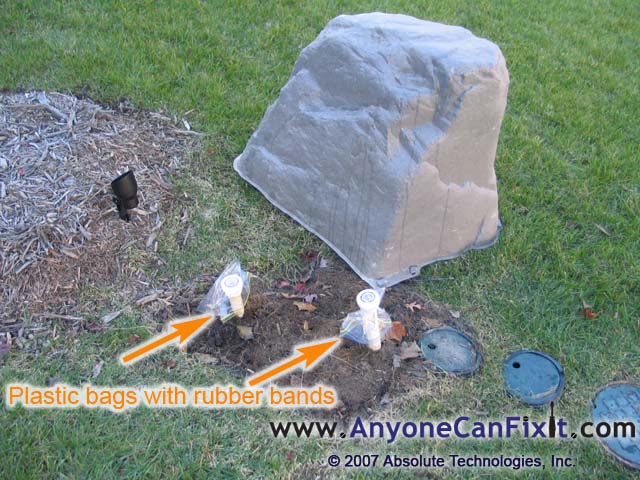
Figure 8: Plastic Bags Over Exposed Pipes Where the Back Flow Valve
Connects
Place two sandwich bags over the two exposed pipes that you just disconnected the backflow valve from and use the rubber bands to hold the bags in place. This will keep dirt from entering the system while the backflow valve is off. Store your backflow valve in an area that is sure to be free from subfreezing temperatures because any residual water left inside the backflow valve may still freeze and do damage.
When it comes time to hook the system up again in the spring, simply perform the procedures in reverse sequence and reverse the operation of the valves. In other words, put the backflow on, shut the ball valve and-open the shutoff valve. When you have completed the process a couple of times you will find it is fairly simple and should take less than five minutes to perform.
When to winterize your system and when to hook it back up? This depends on
weather conditions, but it is always wise not to risk freezing your backflow,
which could result in a costly repair fee. Mid to late October is probably when
you will need to winterize, but any night when the temperatures reach freezing
is a danger to the system. The same goes for the spring: mid to late April is
probably a safe time to hook everything back up, but only if the weather
permits.
Let me know if this helped. I'm curious to know what you thought of the instructions and if they helped you. I like to have satisfied customers and I'm always looking at ways to improve these instructions. Drop me an email if you have a minute to let me know about your experience. Send an email to dharrison@ab-tech-inc.com.
Cheers,
Duane Harrison
Legal Disclaimer
AnyoneCanFixIt.com, a division of
Absolute Technologies, Inc. will not claim responsibility for information
posted within these web pages. While all efforts are made to provide
accurate information, the information is provided at your own risk - use it at
your own risk. We are not responsible for the misuse, incorrect installation,
incorrect information, or failure of any products we cover. NO WARRANTY IS
MADE OR IMPLIED REGARDING ANY PRODUCTS COVERED BY ANYONECANFIXIT.COM or
ABSOLUTE TECHNOLOGIES, INC. NOR DOES ANYONECANFIXIT.COM or ABSOLUTE
TECHNOLOGIES, INC. CLAIM TO PROTECT USERS FROM INJURY OR DEATH. THE USER
ASSUMES ALL RISKS.
The postings, comments, and opinions are provided at your own risk and do not
necessarily represent the views or opinions of AnyoneCanFixIt.com, a
division of Absolute Technologies, Inc. or any manufacturers or
companies listed on this website.
We cannot express how important it is to read the manufacturers instructions
that are included with every product you buy and use. Failure to do so could
result in incorrect use or installation, which could cause serious injury or
death. Any of these instructions may void or limit warranties provided
by the manufacturers. You assume all responsibilities by purchasing any
of the offered fixes.
ALL CONTENTS ON THIS SITE ARE
PROTECTED BY COPYRIGHT. EXCEPT AS SPECIFICALLY PERMITTED HEREIN, NO PORTION OF
THE INFORMATION ON THIS WEB SITE MAY BE REPRODUCED IN ANY FORM, OR BY ANY
MEANS, WITHOUT PRIOR WRITTEN PERMISSION FROM ABSOLUTE TECHNOLOGIES, INC.
VISITORS OR USERS ARE NOT PERMITTED TO MODIFY, DISTRIBUTE, PUBLISH, TRANSMIT
OR CREATE DERIVATIVE WORKS OF ANY MATERIAL FOUND ON THIS WEB SITE FOR ANY
PUBLIC OR COMMERCIAL PURPOSE.
This page was last updated on
11/13/14
.
©2007
Absolute Technologies, Inc.